
What goes in a sign permit set: a checklist, sheet by sheet
The research to do before you draw, the sheets a reviewer expects, and the numbers that have to agree from the cover to the details. With two real permit sets as examples.

A sign permit set usually has a cover with the sign schedule and a code summary, a site plan with setbacks, an elevation with each sign drawn to size and its area measured, sign details and sections, and electrical and attachment notes; many reviewers also want photo renderings. What a city or township requires varies, so the code research comes before the drawing.
Key takeaways
- Research the jurisdiction first: the sign code sections, allowed area and height, illumination rules, any design review district, the application and the fees.
- Put the code summary on the cover and cite the section for every rule you checked, so the reviewer can follow your math.
- Show how you measured sign area: the rectangle or circle around each sign, the frontage it's based on, and the allowance it's checked against.
- Every lit sign needs the electrical basics on the drawings: UL 48 listing and labeling, and NEC Article 600 for the branch circuit, the disconnect and grounding.
- A person checks that every number agrees from the cover to the elevation to the details before it's submitted; approval is the city's call.
On this page
What a reviewer is looking for
A sign permit reviewer has to answer a few questions quickly: is this sign allowed here, is it the size and height the code allows, where exactly does it go, and will it be built and wired safely. A good permit set answers each one on a sheet, with the code section beside the answer, and the same numbers everywhere they appear.
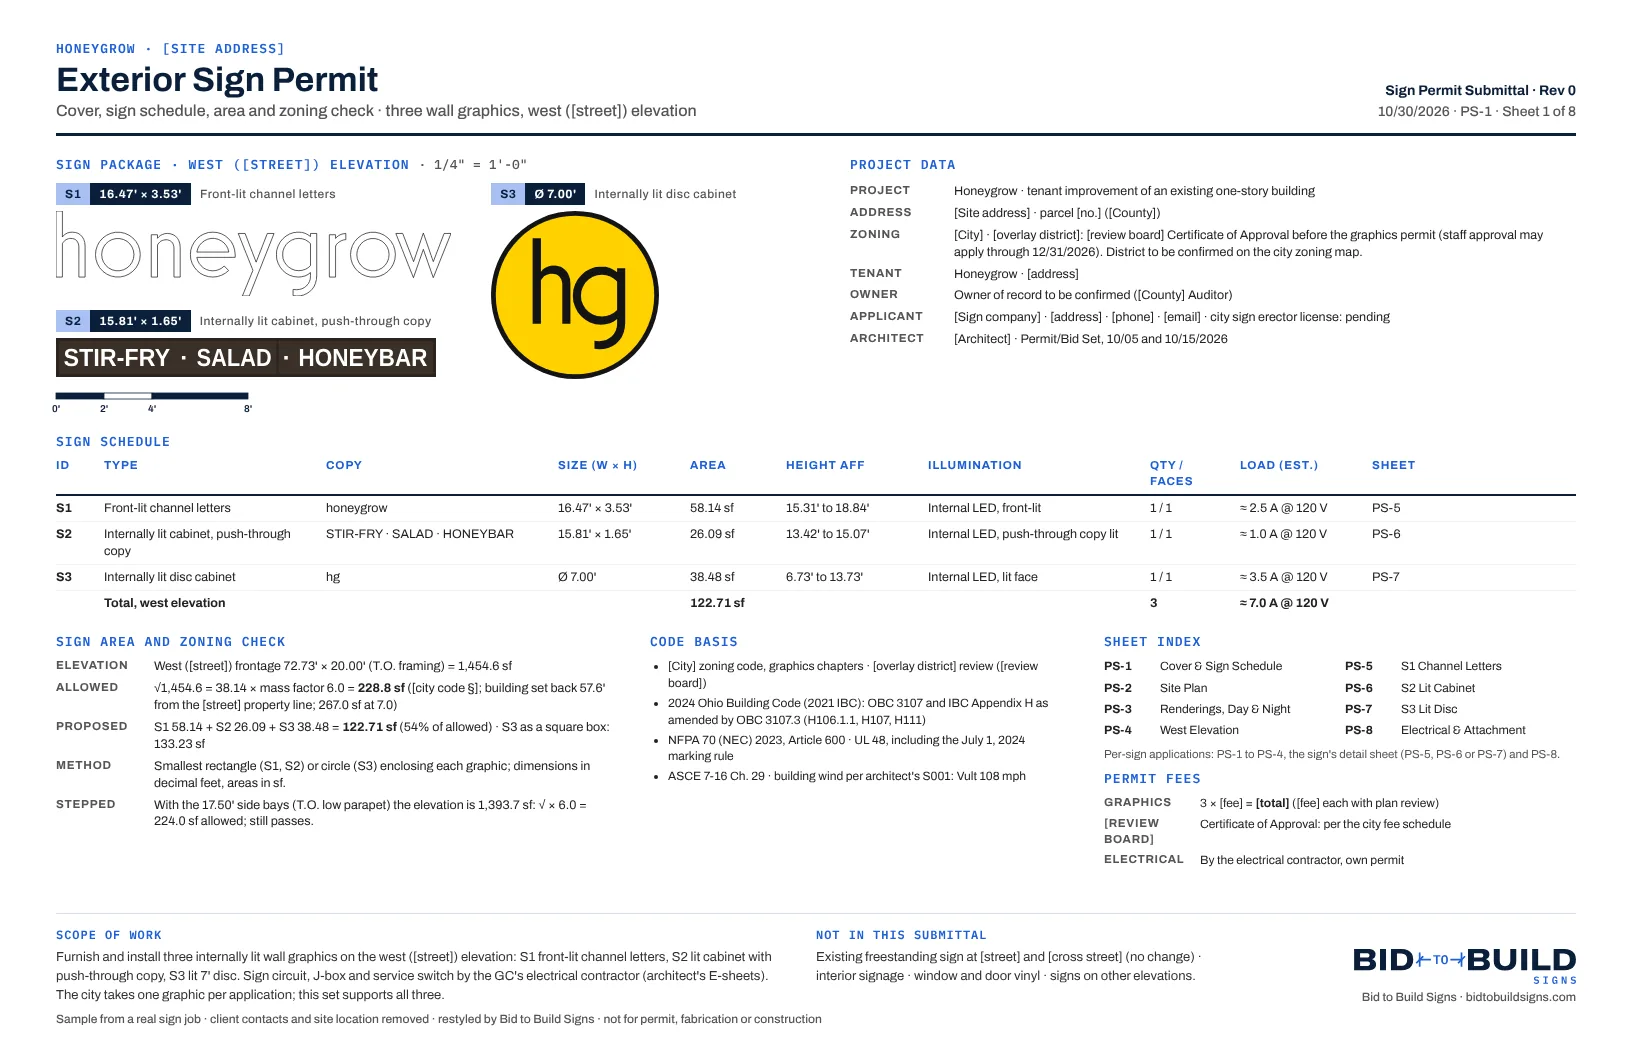
The checklist below is built from two real sets: a front-lit channel letter wall sign in an Ohio township (5 sheets) and three lit wall signs for a Honeygrow restaurant (8 sheets). Your city's checklist wins where it differs, so read it first.
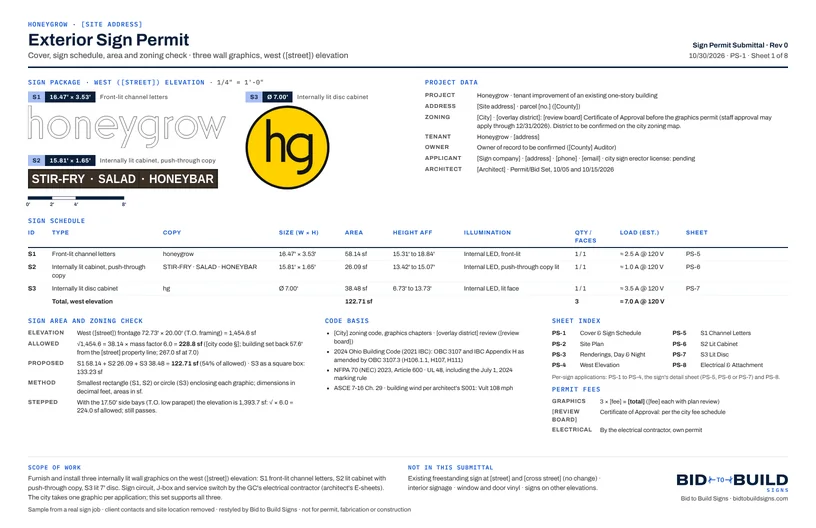 PS-1 Cover, sign schedule & area check
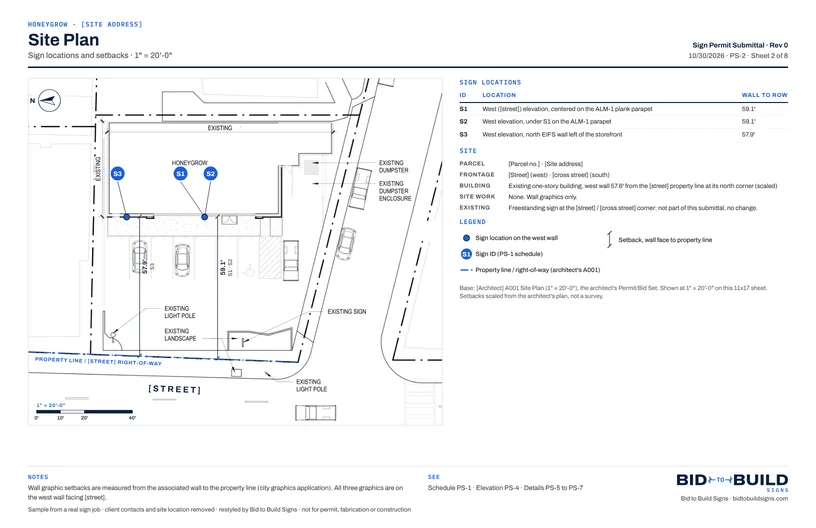 PS-2 Site plan · sign locations & setbacks
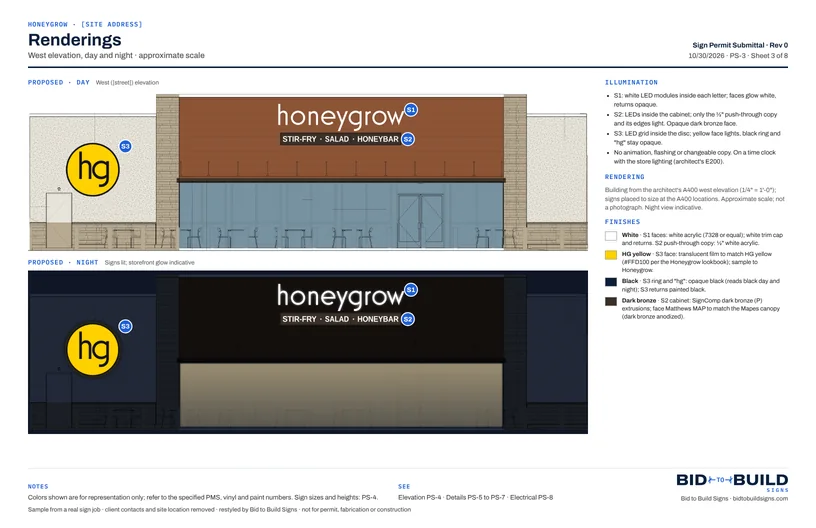 PS-3 Renderings · day & night
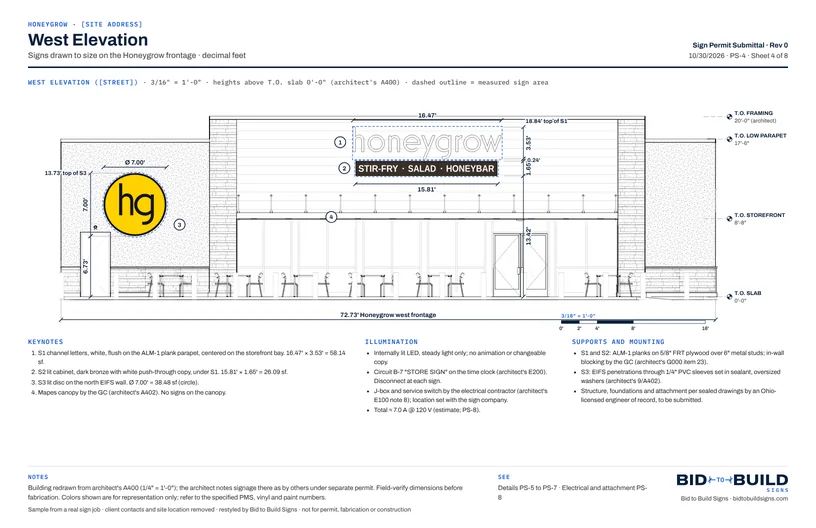 PS-4 West elevation
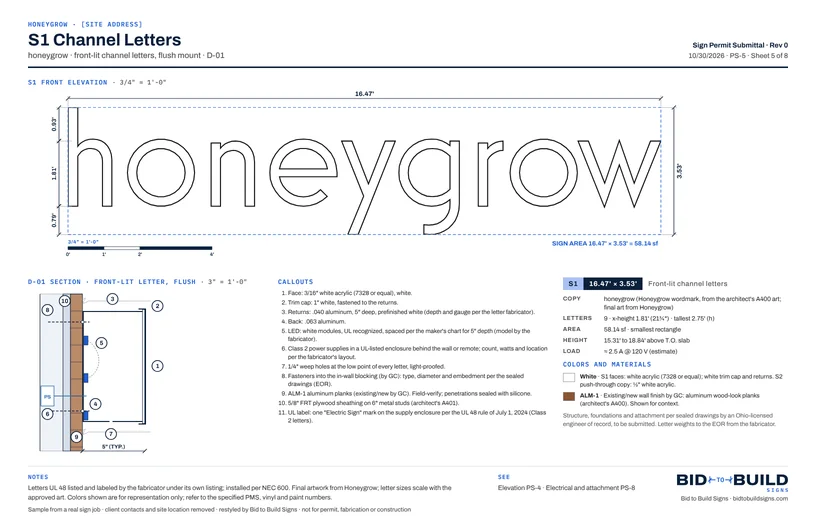 PS-5 S1 channel letters
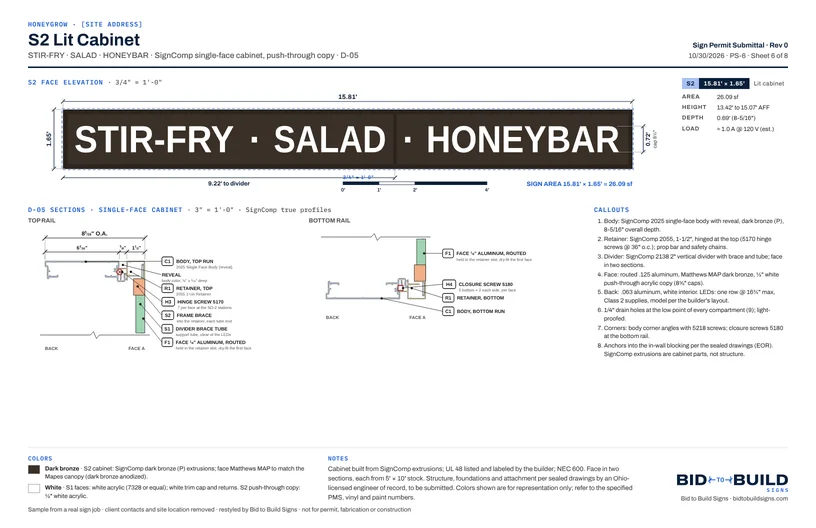 PS-6 S2 lit cabinet
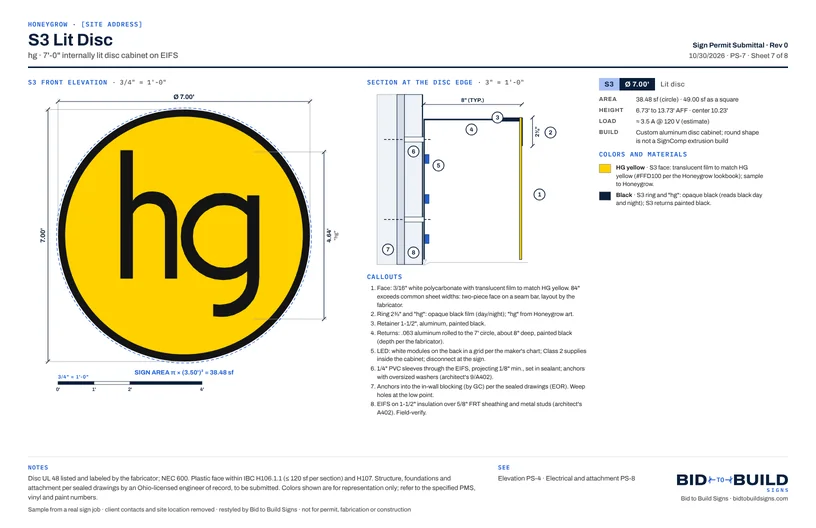 PS-7 S3 lit disc
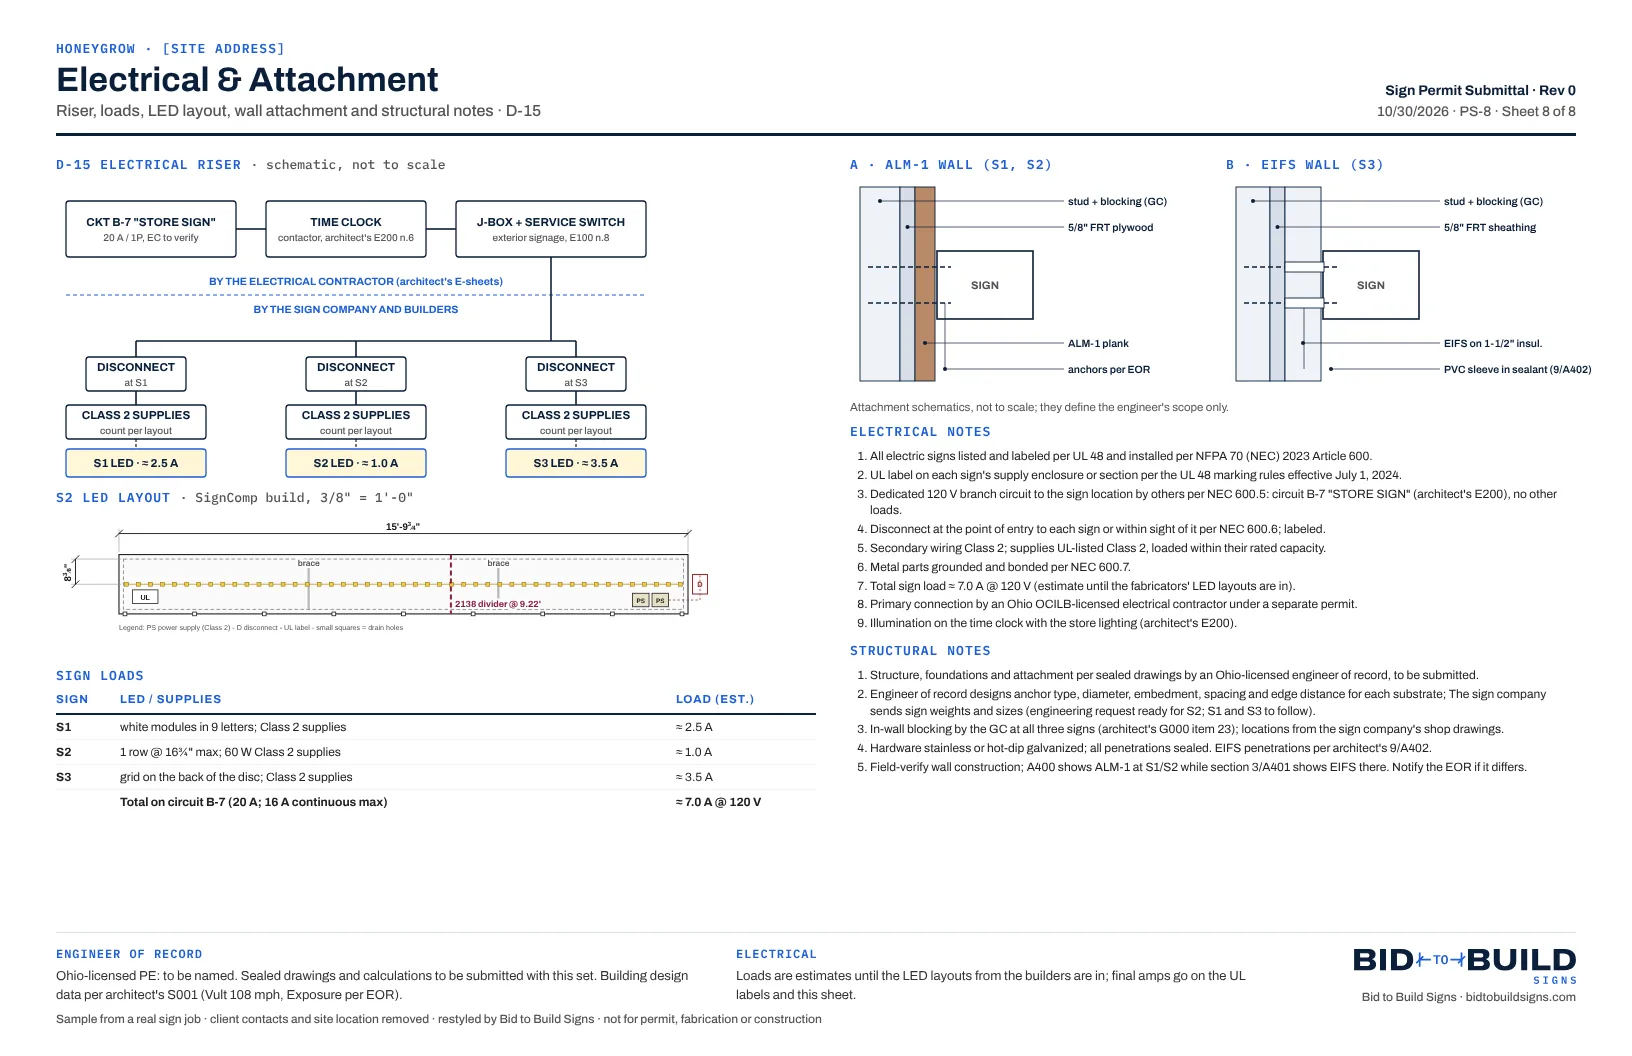
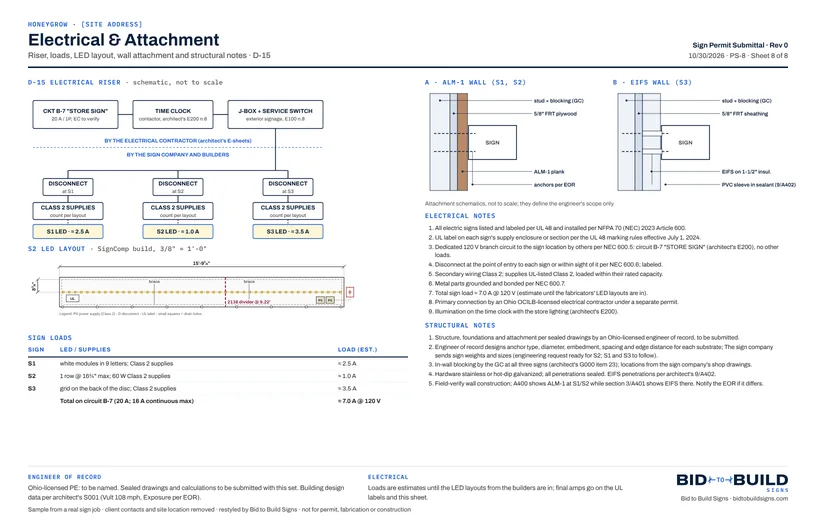 PS-8 Electrical & attachment
The checklist
Research the code before you draw
Find the sign code that governs the site (a city's zoning or graphics code, a township's zoning resolution), the district, and any design review board that has to approve first. Note allowed area, height, setbacks, illumination rules and how many signs each frontage gets, plus the application form, the fees and who to contact. On the township job the workflow read the zoning resolution's sign article first and cited each section it used on the cover.
Build the cover sheet
A sign schedule (ID, type, copy, size, area, height, illumination, quantity and faces, electrical load), the project data (address, parcel, zoning, tenant, owner, applicant), the code summary with section numbers, the sheet index, the scope of work and what's not in this submittal.
Check sign area against the allowance
Show the frontage or wall area the allowance is based on, the code's formula, the allowance, and each sign's measured area. On the Honeygrow cover: a 72.73-foot frontage, an allowance of 228.8 sf, and 122.71 sf proposed across three signs. If a sign's shape could be measured two ways, show both.
Draw the site plan
Property lines and right-of-way, the building, each sign's location and its setback from the property line, a north arrow and a scale. Say where the base came from: the township set scaled setbacks from county GIS; the Honeygrow set scaled them from the architect's site plan and said it wasn't a survey.
Draw each sign on the elevation
The building elevation with every sign drawn to size, dimensioned, with its height above grade and its measured area outlined. Include the frontage dimension the area check uses, so the reviewer can find it on the drawing.
Add renderings if the reviewer wants them
Day and night renderings show the sign in place and how it lights. Say how they were made and whether they're to scale; the elevation stays the dimensioned drawing.
Detail every sign
A front elevation and a section for each sign: materials, colors, construction, how it lights, how it's mounted to the wall or footing, weep holes and where the UL label goes. On the Honeygrow set that meant a detail sheet each for the channel letters, the cabinet and the disc.
Put the electrical on the drawings
Signs listed and labeled to UL 48 and installed to NEC Article 600: the sign branch circuit (600.5), a disconnect for each sign (600.6), grounding and bonding (600.7), the estimated load, and who provides the circuit and pulls the electrical permit.
Cover structure and attachment
How each sign attaches to its wall or footing, and the wind design basis. Where the jurisdiction requires it, an engineer of record designs the anchors and seals the drawings; give the engineer the sign sizes and weights. The Honeygrow set calls for sealed drawings by a licensed engineer of record; the township set lists sealed wind-loading calculations under what's not in the submittal, to be provided if plan review asks.
Do the paperwork
Most building departments also want the application form, the property owner's authorization, the sign contractor's license or registration and the fee. Check whether the electrical permit is separate; on the Honeygrow job it was the electrical contractor's.
Check it before it goes in
A person checks that the schedule, the area check, the elevation and the details all say the same thing, that the code sections are current, and that the sheet index matches the set. Approval is the city's decision: we don't seal drawings or promise approval, and neither should anyone drafting a set.
How sign area is measured
Most sign codes measure the area of the smallest simple shape that encloses all of a sign's letters and graphics, but they differ on which shapes count and how round signs are measured. That's why a set should show the measurement, not just the number. On the Honeygrow set, the lit disc measured 38.48 sf as a circle and 49.00 sf as the square around it, and the cover showed the total both ways so the reviewer could check either.
Sheet by sheet
| Sheet | What it shows | Township set | Honeygrow set |
|---|---|---|---|
| Cover and code summary | Schedule, project data, code sections, area check, sheet index | YesPS-1 | YesPS-1 |
| Site plan | Property lines, sign locations, setbacks, scale and north | YesPS-2, scaled from GIS | YesPS-2, scaled from the architect's plan |
| Renderings | Day and night views of the signs in place | YesPS-3 | YesPS-3 |
| Elevation | Each sign to size, dimensioned, with its area outlined | YesPS-4 | YesPS-4 |
| Sign details and sections | Construction, materials, lighting, mounting | YesPS-5 | YesPS-5 to PS-7, one per sign |
| Electrical and attachment | Riser, loads, disconnects, wall attachment, structural notes | PartlyOn the detail sheet: power supply box and disconnects | YesPS-8 |
What changes when a workflow drafts it
The checklist is the same. The difference is where the hours go. By hand, the research means reading the code on the city's website, then the drawing means building the site plan, the elevation and each detail sheet in CAD or design software, and keeping the numbers in sync by hand when anything changes.
A permit set workflow does the research first and cites what it found, then draws the set from the approved artwork and the site's drawings, with one set of numbers feeding the schedule, the elevation and the details. Your permit coordinator reviews the code summary and the drawings, signs off and submits. See the township set sheet by sheet.